I Was a Winner at SAS4Kids

Pages

Saturday, November 26, 2016

Happy Birthday Kenny!

My grandson Kenny's birthday is today November 25th.  We are going to celebrate it next weekend and I made this card for him.  He is definitely a ball of energy & gets into all kinds of trouble because of it...he just can't help himself!!! He's extremely inquisitive and will talk your arm off and one great aunt commented recently that he will be a great salesman!! I didn't have a stamp of the cartoon Tasmanian Devil (is there one out there I don't know about?)  so I thought this would suffice!  The monster stamp & sentiments are all from the Your Next Stamp Silly Monsters Two & the eyes are from Doodlebug Design Eerie Eyes Sprinkles.  I colored the image with Promarkers (bright green &plum) then glued the Eerie Eyes on, then placed them on a white card stock layer die cut with rectangle stitched dies.  The purple paper layer from my stash is also die cut out with the next size up rectangular stitched die, then mounted on some celery green card stock I had.  I think he'll love it...thanks so much for stopping by to take a peek!!


Thursday, November 17, 2016

Joy To The World

Here is another Christmas card I completed & I have to say I think it is one of my most favorite cards I've made to date.  I totally cased a card I saw on the Gina K Design Stamp Blog & although my embossing folder, stamp & ribbon were different, it is almost identical to hers.  I can't thank her enough for the inspiration & exact measurements of each layer!!  I plan to make some more cards with the exact same layout using different stamps & colors.  The blue embossed layer was made using a Darice snowflake folder.  The tree stamp is from an Inkadinkado set called Trees.  I heat embossed it with white embossing powder & inked over it with Tim Holtz Salty Ocean Distress Ink.  The Joy to the World sentiment is from Sugar Pea Designs & the ribbon is from my stash.  I really loved how it turned out!  Thanks so much for stopping by to take a peek!


Challenges Entered:

Wednesday, November 16, 2016

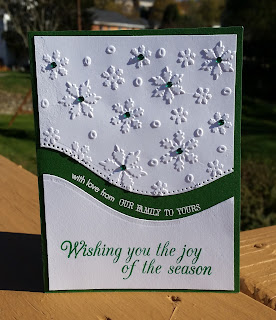
From Our Family to Yours

In my quest to make a multitude of Christmas cards for the SendASmile4Kids foundation & the Caring Hearts Card Drive I turned to Pinterest to get ideas.  I found a card made by the InkyFingeredCarol blog and cased it.  I used a Spellbinder's border die to cut the white card panel apart, and then embossed the top part with a Darice snowflake folder.  The sentiment I stamped on the bottom cut is from Hero Arts CL722.  After placing the top & bottom pieces on some green card stock, I took two separate stamps from the Clearly Besotted "Most Wonderful"stamp set & curved them on an acrylic block as best I could to follow the arc of the border die cut, then stamped them with Versamark & embossed them with Simon Says Fine Detail White Embossing Powder. The last step was to take some Recollection green embellishment crystals & glue them into the center of some of the snowflakes.  I really like how this card turned out!! I made three of them in this green color, and three more using red card stock & crystal embellishments.  Thanks for stopping by to take a peek!!

Monday, November 7, 2016

Sprinkled With Miracles

I just colored this adorable image up recently from Bugaboo Stamps called Christmas Boy.  It is a digital image I purchased a long time ago & for some reason printed up in a small size. I guess I thought I would use him on a larger card base.  Anyway...I colored his suit in a dark gray Promarker color, and for the rest of the image I used red,green, yellow & brown Promarkers. I found a JustRite clear Christmas Blessing stamp "Sprinkled With Miracles" that fit just perfectly in the box below him, and embossed it with white embossing powder & versamark.  I decide to cut a small red card base to adhere it to.  The finished card is just 3 1/4 wide and 3 3/4 tall.  I'm sending it to SendASmile4Kids. I figured although it was small, it would be an appropriate size for a small child to open!!  Thanks for stopping by to take a peek!!


Challenges Entered:

Sunday, October 30, 2016

Blessings, Prosperity & Peace

So here is my next snowman post ...can't believe I posted 3 cards today, but I'm trying to make as many holiday cards as possible this year for charities!  This is another adorable image by Chrissy Armstrong from 2011!  I colored these cute snowmen with my Promarkers & mounted them on a red card base.  The setntiment is from Altenew's Holiday Wishes stamp set.  Hope you like it & thanks for stopping by to take a peek!!


Challenges Entered:


Wishing You The Joy Of The Seasons Part 2

This is another really cute digital stamp by Sassy Cheryl from 2010!!  Back then & still today she makes some really, seriously cute images to color.  I again colored the entire sky using the broad tip of the same blue Promarker as the previous card.  I then used Promarkers in purple, violet, red, tan & brown to color the images in. There were a lot of snowflakes in the background of this digital and I used a white gel pen to color them in.  I mounted the panel on a purple card stock base and stamped the same Hero Arts stamp at the top. Snowmen are so much fun & I have a few more cards to show you using them in the next couple days.  Hope you like it & thanks for stopping by & taking a peek!!


Challenges Entered:

Wishing You The Joy Of The Season

I've started the big push to get a lot of Christmas cards finished to donate to SendASmile4Kids & Caring Hearts Card Drive.  Most charities have an early deadline so that they have time to collect & redirect cards out to their hospital & nursing homes in time for the holidays.  The next few cards I will post were made mostly of some older stamps & digital images that I never got around to coloring, and I was determined to use them for some of my first cards.  This one is a Chrissy Armstrong image, I don't know the specific name.  I first took a blue Promarker & colored the sky with the broad tip.  Then I colored the girl in with green, brown & red Promarkers.  It's probably hard to tell from the picture, but the image came with a bunch of snowflakes in the background, and I took a white gel pen & colored them in.  The sentiment is from a Hero Arts stamp set.   I placed the panel on a red shimmered card base.  I think it turned out pretty cute!  Thanks for stopping by to take a peek!


Challenges Entered:


Wednesday, October 12, 2016

Happy Thanksgiving

I made this Happy Thanksgiving card for the SendASmile4Kids box I'm sending off today.  I'm a couples days late past the suggested deadline, but most of my cards are generally themed, so I don't think it will matter so much.  I don't know the exact name of this Tilda image from Magnolia stamps, I either bought it from another blogger that was having a sale, or one it in a challenge.  Anyway...I think she's a cutie, and I colored her up with my Promarkers, cut her & the orange frame behind her with a set of stitched rectangles, and then placed her on the purple colored card base.  That Happy Thanksgiving sentiment is from a set I got ages ago from a My Creative Stamper fall set.  Thanks for stopping by!  I'm off to the post office!


Challenges Entered:


Sunday, October 9, 2016

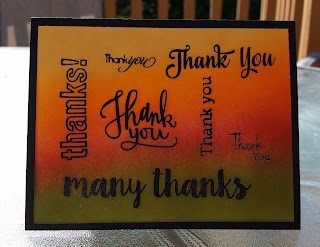
Many Thanks

I managed to squeeze one more card out this weekend!  My son, daughter-in-law & granddaughter  are visiting here from Michigan.  We all went to a family wedding last night with my two daughters who live here and their husbands and children.  It was a fun crazy night!  Anyway....for this card I pulled out as many thank you stamps as I could find, arranged them all on a piece of white card stock, then heat embossed them with black Versafine Ink & clear embossing powder.  Next I used Tim Holtz distress inks, Scattered Straw, Spiced Marmalade, Fired Brick and Peeled Paint to ink over the sentiments, and put the finished panel on a black note card. I used to be intimidated by these inks, but once I started playing with them, really got to like them!  Normally I would use these stamps only as a single sentiment on a card, but saw others using them as a card front & a way of stretching your stamps, and think it is smart & looks really good!  Thanks so much for stopping by!


Tuesday, October 4, 2016

Wishing You Joy

Still trying to go strong & keep up with the Winnie & Walter WCMD challenges & at the same time make cards for SendASmile4Kids!  However my work week has started so that always gets in the way of my craftiness!!  I managed to squeeze this card out late last night after having dinner with my daughter, son-in-law & two grandchildren.  It was time intensive but really fun!  I used a new die I purchase recently from My Favorite Things called Chicken Wire.  I ran the die cut through my machine 4 times, once with white card stock, then 3 more times with blue, aqua, & green card stock.  I stuck the Chicken Wire frame I cut with white card stock on a piece of Stick It, and proceeded to inlay the colored die cut pieces.  I started in the corner with the blue color, then green, then aqua & kept that order from top to bottom with no set plan.  I absolutely LOVE how it turned out, and have the leftover pieces for yet another project!!   I set the whole panel on the same blue colored card base. Then I stamped the Wishing You Joy sentiment with a Colorbox Blue Pigment Ink & heat embossed it, die cut it out with a banner die, mounted it on another blue banner die, and called it done!  Thanks for stopping by!!


Challenges Entered:


Sunday, October 2, 2016

Thanks A Bunch

Just completed another card in my quest to send a box off to SendASmile4Kids.  Something a little different this time...I don't often use these 3 particular colors in my card making, but I was following the WCMD challenge at Winnie & Walters. Thought it turned out pretty cool looking & my husband seemed to really like it!  The stamp is from a Stampendous set called Daisy Thanks.  I stamped it on some watercolor paper with black Versafine Pigment Ink & while it was still wet, heat embossed it with clear embossing powder.  I used the yellow Zig Clean Color Brush to color in the flower centers.  Then I diecut a yellow frame for it with a Spellbinder's Circle Die, stamped the bee & sentiment with the same Versafine ink, and glued it down to a black card base.  Thanks for stopping by!


Challenges Entered:


Saturday, October 1, 2016

Amazing

I just watched a video last night posted by one of my most favorite card makers Jennifer McGuire.  She was sharing a Striped Inlay technique that I immediately wanted to try. Here is the link to her video..http://www.jennifermcguireink.com/2016/09/stripe.html.  I cased her card using the technique with rainbow colors.  I love how it turned out...so bright & cheerful!!  I cut strips of scrap card stock I had in rainbow colors, adhered them to a piece of Stick It, die cut the Amazing word from My Favorite Things Doubly Amazing dies.  Then I stamped with Versamark & white embossed the sentiment above it using the matching Amazing stamp set.  I die cut the Amazing word again on white card stock & inlaid it back into the rainbow strip.  I adhered the strip to an A2 size white card, and used the MFT cross stitched die to decorate above & below the strip.  I have many more rainbow colored card strips left over and will definitely use them with this technique again in future cards.  Thanks for stopping by!!


Challenges Entered:


Happy Fall

   I'm trying to make a bunch of cards to send off to SendASmile4Kids with a Fall & Halloween theme. This organization takes the cards we send in & disburses them among children's hospitals across the United States for the patients, staff, and patients families to use, adding there own handwritten message inside.  Thing is...you have to send them in ahead of time, so the deadline for these cards I'm making is October 5th!!  So I'm trying to make a bunch this weekend & send them off on Monday to the designated team member for disbursement!  Anyway...I made six of these fall cards using the Hero Arts Tree Layering Stamp #CL886.  They were basically all the same with a little twist.  I liked how this one turned out the best! I used Colorbox pigment inks to stamp the trunk & leaves, and used a gold embossing powder with Versamark to add the sentiment, which also comes from the same stamp set.  Thanks for stopping by!!


Challenges Entered:


World Card Making Day

Today is World Card Making Day & Winnie & Walter (a company that makes a lot of great stamps & dies among other things) is having a blog hop, plus lots of challenges to enter to win money to shop there!  I didn't participate in the challenges last year, but thought I'd try this year to enter as many as I can because...why not?  I'm trying to get a box of cards together for SendASmile4Kids & it's a perfect way to push myself to get some done.  Anyway...the first challenge they made very easy...take a picture of your craft area & what you're currently working on.  I just stamped & colored these cuties last night so that I could create cards with them.  The girl holding the pumpkin is "Lil Pumpkin" by Pure Innocence, and the other is Tilda from Mangolia stamps, but its an older one & I don't know the exact title. The orange panel is some card stock I heat embossed with Versamark & black embossing powder using a batty background stamp. For the black card stock I inked up a spider web embossing folder by Paper Studio with white pigment ink & ran it through my Spellbinder Grand Calibur.  I will use those panels to make some other cards.   Thanks for stopping by!


Challenges Entered:


Thursday, September 22, 2016

Happy Birthday

Fall is supposed to be closing in upon us but here in Northern Kentucky it is still reaching a temperature of mid to high 80's everyday so I'm still wearing sleeveless clothes to work & not feeling the fall craze!  I tried to case a very happy rainbow colored card this last week because I liked the design & the bright colors made me smile!  Of course I had some definite bumps along the way, but never gave up on it, and I'm thinking it still turned out pretty good!!  The rainbow colored stamp across the middle is Interlocking Backdrops from Lawn Fawn . I'm not even going to try to explain how I colored it.  But I did stamp it & color it with my Promarkers and then trimmed the strip out & glued it down on some white card stock.  The Happy Birthday & "You're So Special to Me" stamps are both from a Hero Arts set..don't know the name but the number is CL582.  I glued it to a shimmery red colored card base, and then used the clear Wink of Stella pen on the heart.  I think it will make someone smile just like I did!!  Thanks for stopping by!


Challenges Entered:


Saturday, September 17, 2016

Valentine

This is my final creation/inspiration post as guest designer for Great Impression Stamps for their September Challenge!  I chose this cutie All A Flutter Lottie stamp from the store & the Would You sentiment to create a cute Valentine Day Card.  This stamp could also be used for a general Love You or Miss You card, or a Baby Shower card.  I thought about stamping it without the hearts & making it a birthday card with balloons strung to his trunk!!  That's why I picked this stamp as a guest designer...so versatile & so many possibilities!  So I colored the image with my Promarkers ( Cool Grey 1, 2 & 4, and Salmon Pink for the hearts.  I cut him out & framed him with some stitched oval dies, and Salmon colored card stock from my stash. I tied some grey & white grosgrain ribbon from my stash around the panel & into a bow.  I think it turned out pretty cute!!  Thanks so much for stopping by.  I would also like to say a big Thank You to Great Impression Stamps for allowing me to be a guest designer for their September challenge!!


Challenges Entered:


Saturday, September 10, 2016

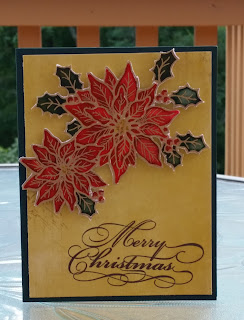
Merry Christmas

This is the second card I created as a guest designer for  the Great Impressions Stamps September Challenge.   I know it's still early, but I've already seen other Christmas cards popping up on blogs, and thought this Poinsettias & Berries stamp by Great Impressions would make a beautiful Christmas card.  I gold embossed the stamp on some watercolor paper, and colored it in with Zig Clean Watercolor Brushes.  This is only the second time I've used them, I've been a little intimidated by them, but I watched a video by Jennifer McGuire using them, and thought I'd give them a serious try.  I colored the flowers with Carmine Red & Brown, the leaves are Olive Green & Deep Green, the flower centers with Pale Green & Yellow, and then fussy cut it out.  I really enjoyed using the brush markers & thought I did a decent job with them, they're pretty easy to work with.  I popped the poinsettia up with foam tape on this gold card stock from BoBunny, which was a ridiculously tedious task, considering all the pointy parts of the flowers & leaves!!  The Merry Christmas stamp is also from Great Impression, I used a dark chocolate Colorbox pigment ink to stamp it.  Then I added the whole panel to a dark green A2 sized card base.  Hope you like the results!  Thanks for stopping by to check it out!


Monday, September 5, 2016

Grateful for You

Fall creations are popping up all over the place, and I decided to create a Fall colored card myself today.  I recently purchased a stamp set from My Favorite Things called Thankful Thoughts.  I really like the 3 large sentiments plus small accompanying sentiments...great for making simple Thank You cards!  I decided to use the set to create a card for their current sketch challenge, and this is what I came up with.  Not my best work..and I'm not even going to go through the whole process that took place because there were so many changes it would be too bizarre to explain.  I stamped the grateful word & the rest of the sentiment with a dark chocolate Colorbox pigment ink, but I threw some clear embossing over the grateful word itself & heat embossed it.  All of this was done on eggshell cardstock.  The flower & leaves that come with this set were also inked with Colorbox pigment ink & fussy cut out. I attached the flowers with some foam dots.  I couldn't really get a good picture of it, and it looks much better in person!!  Hope you enjoyed...thanks for stopping by!!


Challenges Entered:


Sunday, September 4, 2016

You're So Very Special To Me

I was pleasantly surprised to find out that I had won July's monthly challenge over at the Great Impression's Challenge Blog, and even more surprised to find out that because of that win, I was invited to be Guest Designer for their September challenge.  That was a little scary because I'm not a designer...I just color & make cards for fun, but I thought, what the heck...it can't hurt right!! They've got a lot of cute stamps in their shop to create cards with!  So here is their Rose Bouquet stamp I chose to color following the inspiration colors for the month.   I colored it in with my Promarkers....Crimson & Burgundy for the roses & Bright Green & Forest Green for the leaves.  The sentiment I chose to use is also from Great Impression Stamps.  I thought I should add a little something more to this CAS card & found these Imaginisce hearts I've had forever and a day that seemed to match in color!  So I glued them down & called the card complete!  This stamp & sentiment could be used for so many occasions... Wedding, Anniversary, Valentine's Day, even just a "Love You" card to your hubby!!   Hope you like it!


Challenges Entered:


Sunday, August 21, 2016

Happy Birthday Addison

 My granddaughter Addison's 4th birthday is coming up next weekend, and this is the card I made for her.  This little girl's name is Birthday Balloons Ellie from Paper Nest Dolls.  I colored her in with my Promarkers using almost the exact colors as the picture of her that comes with the packaging....  I knew I had some cute birthday paper that would match the colors perfectly!  I used a stitched rectangle die to cut her out, and both the red printed paper & numbers paper behind her are from a 6x6 DCWV stack called The Birthday Wishes Stack.  I cut the number 4 out with my Cricut using the same red printed paper.  I think it turned out cute!  Thanks for stopping by!


Challenges Entered:


Sunday, August 7, 2016

Playing With Chalk

So I was checking out some tutorials on Pinterest to get some cardmaking mojo, and saw a tutorial on ways to use chalk.  This lady was using Stampin Up chalks....I actually have a container of Stampin Up chalks (Stampin Pastels) I bought ages ago when I used to go to their home parties. I had hardly ever used them, in fact it's been so long ago, I do not remember them ever showing us this technique.  Anyway...you stamp an image with Versamark on your card stock and color it with chalks using sponge daubers. So I stamped this flower from the Color Splash Stamp & Stencil set by Recollections all over with Versamark & used three pink colors of chalk from Stampin Up to daub the color on. I believe the 3 colors are Pink, Rose and Magenta.  The sentiment is from the same set as the flower.  I think it turned out awesome & I'm going to have to use this technique again in future cards!  The colors are so much prettier in person!


Challenges Entered:


Thursday, August 4, 2016

Stencil Heaven

I know I am way behind all the other crafter's/cardmaker's out there in the world that have accomplished amazing creative heights...and I'm okay with that...but I just want to say that I'm having so much fun finally experiencing inking with stencils!!  I'm kind of having too much fun...you know...that moment when you are really enjoying yourself and you think you will never make another card without using this technique??  So here are the cards I made using the stencil/inking process. I used Tim Holtz Distress Inks.  The stencils on the right & left are Hero Arts stencils & the one in the middle is from Inkadinkado.  You really just need to add a sentiment to finish them off.  I loved how they turned out!


Challenges Entered:


Saturday, July 30, 2016

Crazy Dog Birthday Wishes

We are celebrating my granddaughter Shawnee's birthday today so I made this card for her using one of the Tim Holtz Crazy Dogs & Crazy Things stamps & dies. It can be time consuming coloring & cutting out all the little embellishments when you want to pop them up on the card like I did, but it's so worth it!! I used my Promarkers to color him & attempted to put glossy accents on his eyes, but it got all botched up, so I covered them up with some googly eyes which I thought looked even cuter!!  I didn't have any pink paper that matched the pink Promarker I used to color with, so I just took white card stock & used that same pink Promarker & colored all around the edges.  I popped all the elements on another piece of white card stock I cut out using a stitched rectangle die I had.  I had just enough room on the right to stamp the Birthday Wishes sentiment.  Thanks for stopping by to take a look!


Challenges Entered:


Thursday, July 21, 2016

Happy Birthday

I am always looking for inspiration to make/get me inspired to make cards no matter what type.  My Favorite Things Stamps are doing a "Camp Create" challenge to inspire you to make cards for the week with a specific theme such as Inlaid Die Cutting for example.  So I'm trying to participate and have made cards for 4 out of 5 challenges thus far .  The only challenge I haven't tried is the foilage challenge.  Anyway...here is my Coloring on Kraft Challenge.  The whole idea is to color in any way you can on kraft paper.  Here is my version...for my husband's birthday card!!  I used Prismacolor Pencils to color the Crazy Bird image by Tim Holtz.  The sentiment I used is from the MFT Wrapped in Love stamp set. Thanks for stopping by to take a look!!


Challenges Entered:


Inlaid Made Easy

Another MFT Camp Create challenges is "Inlaid Made Easy"!   I had never attempted inlaying a die cut on a card yet but had watched many videos doing so!  So I used the flowers from Stampin Up Posy Punch and stamped them across the front of a white card base & then die cut the word Amazing from MFT Stamps over top of them.  The stamped words "You Are" are also from a MFT set.  I collected all the bits & pieces from die cutting & put them back in place where they belonged across the card front among the posies.  The inks I used to stamp the posies were from Colorbox & Versamagic.  The only "goof" I feel like I made in making this card was the colors I chose.  The Amazing die cut in red doesn't show up much when running through the middle posy!  Oh well...that's what Camp Create is about right?  Try & learn!!  Thanks for stopping by!!


Challenges Entered:


Magnificent Masking

Another Camp Create challenge by MFT stamps was to do a masking project.  I had just completed a card using masking & it was very tedious, masking upon masking, upon masking...but so much fun to see the results...my daughter was amazed when I peeled off all the masking!  I'm sure there are less tedious masking techniques out there in the card making world that you can try!  I used the Hero Arts Stamp Set # CL944.  It has a matching frame cut set, but I did not use it on my card.  I used Colorbox Pigment Ink sets to stamp these flower & leafs layers, and the Happy Birthday sentiment is from the Simon Says Big Scripty Greetings stamp set. Thanks for stopping by to take a look!!


Challenges Entered:


Creative Background

One of the MFT Camp Create challenges was to color a creative background for your card using small stamps!  I don't have many small stamp sets precisely because they are a challenge to use & therefore not a stamp set I desire to purchase.  I was going to just give up trying stamps small enough to use on this challenge, but found a beach set at the last minute.  I colored them with Promarkes Mandarin Orange, Bright Green, Yellow, & True Blue, then cute the panel out with a stitched rectangle from Simon Says Bundle of Stitched Shapes.  I have no clue where this stamp set came from...probably the $1.00 bin at Michael's, but it was enough to use for the card challenge!  I die cut both sentiment panels out with Simon Says Stitched Rectangle set & stamped & colored the bikini. Thanks for coming by to take a look!!


Challenges Entered:


Wednesday, July 6, 2016

Your Kindness Means So Much

 I am not a creative person by nature- I love making homemade cards so it is my hobby since I work full time & I squeeze it in whenever I can!!  I made this card using the Simon Says Stamp Spring Flowers Set.  I saw many card maker's tutorials & thought it looked like a CAS stamp set for me!!  The MFT blogspot has a color challenge going on right now, and I thought I might as well use their pretty color challenge to complete my card. Not having their exact ink colors, I colored the flowers, leaves & butterfly with the Promarkers I have on hand that matched the closest.  The butterfly stamp I used is from the Daisy Thanks Stampendous set, and I used the clear Wink of Stella marker on it to give it a little sparkle. The sentiment is from a Recollections set I own.  I really like how it turned out & think I'll make a few more using different colors for the flowers & butterfly.  I will be donating this to the Send A Smile 4 Kids charity.  Sorry about the awful picture...had to get a new computer recently, and took this one from my phone. Thanks for stopping by!!

Challenges Entered:


Wednesday, April 27, 2016

Congratulations Shawnee!!

My granddaughter Shawnee makes her First Communion this Sunday.  She is such a beautiful little girl and is always watching out in a motherly fashion over her 6 siblings, both older & younger!!  I made this card for her using the script sentiment from Our Daily Bread First Holy Communion Set.  I stamped it with Versamark first, then heat embossed it with gold embossing powder.  Framed it with a piece of DCWV  foiled card stock, tied a gold bow around both using ribbon from Michael's called "Celebrate It" Holiday, then mounted it on a white card base.  I also gold embossed  another sentiment on the inside of the card from the same Our Daily Bread set which says "God Bless You on Your First Holy Communion".  Thanks for stopping by to take a peek!!


Challenges Entered: