I Was a Winner at SAS4Kids

Pages

Thursday, December 3, 2015

Peace & Joy

I love the idea of clean & simple cards.  Whenever I'm looking at Pinterest or Blog Hops that showcase cards...apart from the obviously beautiful & ornate cards that I longed to make, I seem to be drawn to the clean & simple cards more & more...cards that have a big sentiment as the focus point & showcased in a big way with a few perfect items around them.  I made this card casing one I had pinned from Split Coast Stampers with that clean simple idea in mind.  Of course, it wasn't as simple as I thought because I didn't have the same small sentiment they had, nor the measurements of  those three strips of embossed paper. Believe it or not I had to fuss with those embossed panels quite a while but somehow I managed to piece it together and just went with a larger sentiment.  The snowflake embossing folder is by Darice, the white die cut is from Spellbinder's Medallion Two. The sentiment is a just a portion of a stamp from Hero Arts #CL1722.  I added some pearls from my stash & called it finished!!  Thanks for stopping by to take a look!


Challenges Entered:


Wednesday, December 2, 2015

Merry Christmas

Below is another Christmas card I made on our crafting weekend in October.  This is a Meljen's Digital Design image. (I had to dig around to find out where it came from).  It's such a sweet Christmas scene & although it took awhile to color those teeny tiny bits & pieces I thought it turned out pretty cute!!  I colored them with my Promarkers, and used a clear Wink of Stella marker to make the snow sparkle though you probably can't see it that well in the photo!  Thanks for stopping by to take a peek!!


Challenges Entered:


Tuesday, December 1, 2015

HO HO HO!!!

Hello out there to everyone in card maker land...haven't posted in quite a while!!  I'm going to post a number of cards in the next few days, mostly Christmas cards that I made when my three daughters & I spent a weekend in late October being crafty in a house we rented just for that purpose!!  We had a blast & want to repeat the weekend craftiness twice a year if possible!!   So I made this CAS card using a Hero Arts set #CL113.  I searched for examples using this stamp set and found a fellow card maker that used this set to create a card.  I basically cased/copied her card except she masked her tree stamps so that one wouldn't be stamped in front of the other. She might have added some other components, but I left it with just the stamps.  I searched the last couple of days trying to find her blog & give her kudos for helping me before I posted this, but for the life of me couldn't find her.  Anyway...thanks for stopping by to take a look!!


Challenges Entered:


Sunday, September 27, 2015

Happy Birthday!!

As soon as I saw these Tim Holtz Crazy Bird stamps & dies I had to have them!  I'm not even an accomplished colorist/cardmaker to justify the cost but I didn't care...they were way too much fun to look at....those faces....hysterical!!  I still need to purchase the Tim Holtz Crazy Things that embellish those Crazy Birds!  Anyway...I wanted to make my oldest sister Karen a birthday card.  She will be 60 + years in about a week & we joke about the older we get the more our bodies break down (aka fall apart!)  I made this birthday card for her...his crazy eyes kind of make him look desperate/shocked/alarmed!!  I colored him by mixing some Daler-Rowney? watercolor tubes I bought dirt cheap at Walmart. His wings, beak & eyes are colored & die cut out separately & added with dimensional foam.  The Tropical Teal colored card stock, Lemon colored card stock as well as the green button are from my stash.  The sentiment is from Art Impressions Giant Cake Girlfriend set. I attached the Crazy bird on the card with dimensional foam & doubled up on the foam under his eyes & added glossy accents to make them even more buggier!!  I think this card will crack her up & make her smile when she opens it!  Sorry for the bad picture!!  Thanks for stopping by!


Saturday, September 26, 2015

Sending Smiles

Well this card started off as an experiment.,  I had no Mojo, it was late at night & I decided to go off the grid & do something totally different for me.  You know those telephone books that you NEVER use anymore but the telephone company is still delivering to your front porch?  Well we had one delivered to us that day.  I've seen other card makers use printed pages from a telephone book, reading books, etc to create cards.  I decided to just water color one page with Tim Holtz inks, and die cut something out of it later after it dried.  Well silly me forgot that papers such as this are not watercolor paper, so when I added my inks & spritzed with water, the inks didn't magically spread on their own!!  Not wanting to waste the ink I just picked the paper up & ran it all through the ink colors I had placed on my mat until it was saturated with color & called it a night. The next evening when it was good & dry I cut flower layers out of it using Spellbinder's Rose Creations die.  It looked boring so I spread the layers with some clear Wink of Stellar glitter pen & stuck a button from my stash in the center. Staring at it, I suddenly remembered (by some miracle) that I had ribbon my daughter had given me ages ago that contained the same colors as my flower, so I glued that on & tied a little bow on the end, added my sentiment from the Simon Says Stamp OWH Brave set and added the panel to a purplish card base.  As silly as I felt trying something creative like inking up telephone book paper...I really like how it turned out!! The picture doesn't do it justice...the flower looks brighter & sparklier in person. Thanks for stopping by!


Challenges Entered:


Sunday, September 20, 2015

Total Card Fail!

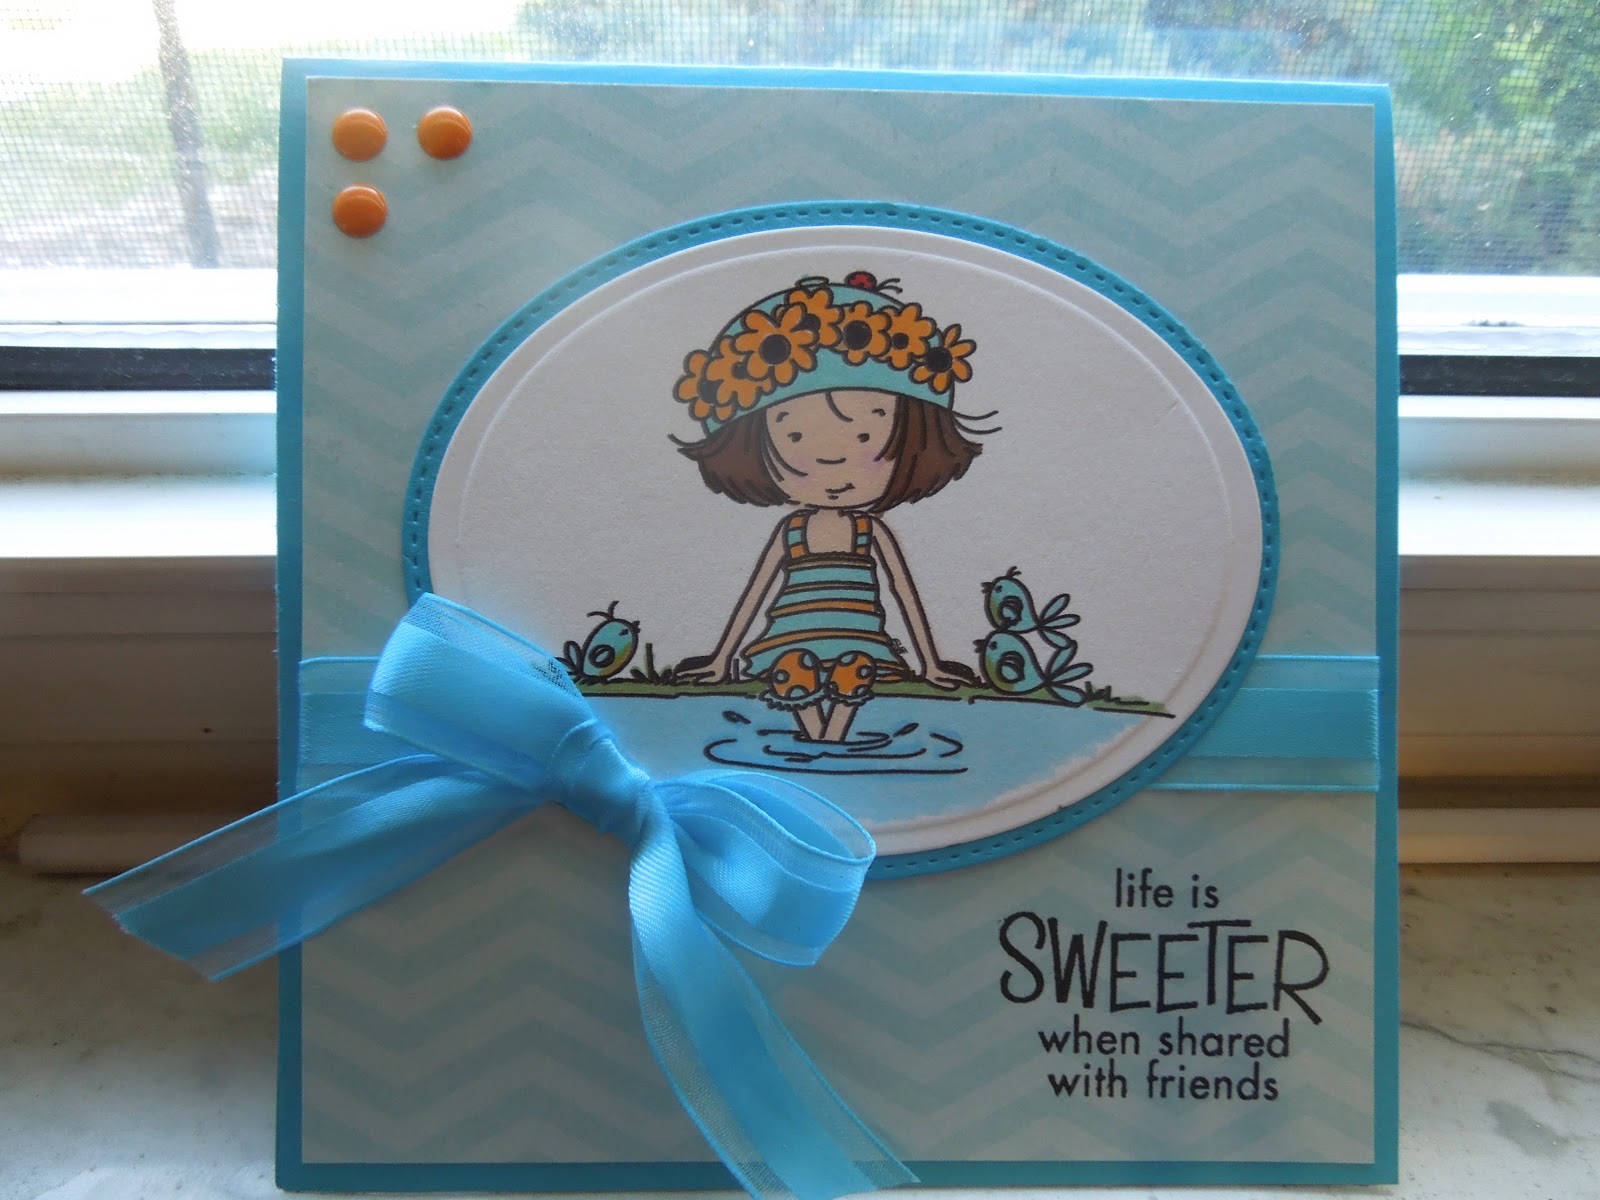
My granddaughter Makayla turned 10 years old this past Monday, and we're just getting together today to celebrate.  I had her gift for a week already, and basically knew what stamp I was going to color for her card. It was yesterday evening when I remembered I still had to make it!!  The stamp is Punk Amara from the Paper Nest Dolls, and I colored her up with my Promarkers and added some Clear Wink of Stella to her hair & the star on her shirt.  Thought it was really cute so far!  I cut her out using an MFT Stitched Oval Die, picked some blue & pink paper from my stash, cut the blue paper with a Simon Says stitched rectangle die, and started to put the card together.  That's when it got really ugly!!!  Even though it would cover up some of her cute leotards & boots, I thought I would do something different & heat emboss the sentiment onto vellum...first fail...even though I used my anti-static tool, the black embossing powder smudged & left some random sprinkles under some of the words!  Also  I clearly wasn't thinking when I decided to add it to the card with glue dots on either side...second fail...you can see them through the vellum!  Oh well...I told myself...she's only 10 years old.  She'll take a 2 second glance at the card, toss it down, & start ripping open her present..she'll never notice the boo-boos. The best (or should I say worst) was yet to come though!  I stamped a birthday wish inside the card with black ink, waited a minute to make sure it was dry, then closed up my card to take an overall look. Well look of horror is more like it!  I realized I must have gotten ink on my hands somewhere because there was a big black fingerprint on the upper right hand side of the oval, a less obvious smudge on the lower left hand side of the oval, and another big smudge on the top inside of the card... third fail.  Believe it or not I didn't totally panic...although there were a couple of swear words that leaked out of my mouth!  All the experts call it a "chance to embellish" but I call it one gigantic mess!!  Thus the gold stars placed on either side over top of the smudges.  It looked okay though...matches the star on her shirt right?  I already had gold sequins in the opposite corners though & didn't think it all looked that great together but whatever!  As for the inside smudge on the top portion of the card, I simply covered it with a new white piece of cards stock. Went to bed & decided it was okay but of course the ugliness continued the next day when I went to sign it & put it in an envelope.  I don't think you can tell in the picture, but the gold star on the left was not sticking well with the glue dot I had used, so I tried to turn it a fraction & smoosh it down, and the pink paper ripped a little underneath. REALLY!!!!  Oh well..I'm giving it to her anyway LOL!  Thanks for stopping by...sorry to ramble on about it...thought it might give a couple of you a little chuckle!


Challenges Entered:


Monday, September 14, 2015

Frank the Fun Dog

Recently I purchased some fun stamp sets from Unity Stamp Co.  I wanted something different from the usual stamps I use to make cards & thought the sentiments that came with it were fun also! I just received the sets this past Saturday.  This is the card I made using Frank the Fun Dog set.  Unity Stamp is having a sketch/color challenge & I tried to challenge myself to whip this card together to enter.  Coloring Frank was fun, putting the card together tonight within an hour was way more stressful!!  But really...how can you go wrong with such a fun image??  I am donating this card to the a children's hospital & thought it would make a young child chuckle!  I colored Frank with my promarkers, The orange/reddish background paper is DCWV Green stack, the tealish color from DCWV Dots, Stripes & Plaids mat stack.  The eggshell colored paper is Stamping Bella.  Thanks for stopping by to take a look!!


Challenges Entered:


Friday, September 11, 2015

Congrats Tyler!

My sister Mary is having a college graduation party for her son (my nephew Tyler) tomorrow.... lots of good food & relaxed atmosphere.  Hopefully the weather will be nice because her & her husband just built a new house and there's lots of dust & dirt & construction surrounding them.  They were looking around for a nice ranch style to buy (eventually retire in) but weren't having any luck, so they ended up finding a nice place close by to build their own.  Anyway...Tyler has done quite nice for himself & has already settled into a well paying job that was waiting for him when he graduated!  He went to Thomas More College here in Northern Kentucky, and there colors are royal blue, black, white & gray.  I needed to make a card for him lickety-split last night, and  I remembered that I had My Favorite Things Blueprint 11 die that spelled out the words "You Rock" that I had purchased earlier & never used yet.  Plus I follow the MFT blog and knew they were having a "use your MFT stamps & die" challenge.  I would definitely need some guidance in a hurry so I went to their website & searched their project gallery and.. BAM!!  One of their designers ( Michele Boyer from  http://papercuts.blogs.splitcoaststampers.com/) had created a card using the same blueprint die.  She used different colors, the card was for a girl not a boy, she added shiny crystals to it & die cut it a little differently than I did, but basically...I made the same card!!  The stamp is Pure Innocence "Graduation Boy" and I colored him with my Promarkers!  Can't thank Michele enough for the inspiration!  So here is my card for Tyler...thanks for stopping by to take a look!!


Challenges Entered:


Wednesday, September 9, 2015

Unforgettable Friend

I unearthed this super cute elephant stamp when I was trying to clean my craft desk off for the umpteenth time!!  I seemed to keep coming across him lately, and I'm telling you for a fact....I stamped this image YEARS ago when I was going to Stampin Up parties with my daughter.  Her friend was a Stampin Up demonstrator & we all got together at her house one night and each of us brought our stamp collections & white card stock & shared each others stamps, ate some great snacks, probably had a glass of wine!!  Anyway...I colored him up with my Promarkers in about 5 minutes, cut him  & the gray card stock behind him out with square stitched dies from Your Next Stamp.  The patterned paper & card base I put him on are from my stash!  I cut out the large stitched heart using Simon Says Stamp Bundle of Stitched Shapes & colored it with the same Promarker as the small hearts. I went over all of them with a clear Wink of Stella marker.  Fastest card I've ever completed & I think it's so cute!  Most of the times I lament forever over a card & get nowhere fast!  Thanks for stopping by to check it out!!


Challenges Entered:


Sunday, September 6, 2015

Owl Be Here

Finally got around to making a card with this super cute owl!  The owl & sentiment are from a Sweet & Sassy Stamps set called Owl Be Here.  I also purchased the Owl Die that coordinates, but this time I just fussy cut him out and colored him with a few Promarkers, then added glossy accents to his eyes.  The other papers I used behind him are from my stash. The card is fashioned after a sketch I saw on the Reverse Confetti blog.   There are a lot of other cute sentiments that come with this set, so I imagine you will be seeing him/her again soon!  Thanks for stopping by!


Challenges Entered:


Tuesday, September 1, 2015

Love You!!

Found another CAS style card (my favorite) on Pinterest from Mary Gunn Funn's blog.  I used a heart die from a set I own (can't remember the name) and cut five stars across a white panel.  Then I picked out some patterned papers from my stash & glued them inside the hearts.  I glued some black ribbon with white dashes on the top & bottom of  the heart panel.  The sentiment is from Hampton Arts.  I added some black enamel dots to finish it off!!  Thanks for stopping by!


Challenges Entered:


Monday, August 31, 2015

Celebrate You!

While scouring Pinterest yesterday to get some ideas/inspiration, I came across several cards that have a design like the one I created below.  Even better, I have this cute flower stamp that I've had for quite a while and I'm pretty sure I've never used before!!  The flower stamp is called Flower Garden made by Stampabilities.  I colored them with my Promarkers & Spectrum Noir markers.  The sentiment is from a Hampton Arts set.  The lavender bow & card base are from my stash. Thanks for stopping by to check it out!!


Challenges Entered:


Sunday, August 30, 2015

Happy Birthday Addison

We celebrated my granddaughter Addison's birthday yesterday afternoon.  Her most favorite cartoon/show figure right now is Peppa Pig...too funny!!  I somehow doubted that any organization would make a Peppa Pig stamp so I found one on the internet to make her birthday card.  I colored her up with three different shades of pink from Promarkers and a yellow shade for her crown & stars. Then I colored over the crown & starts with the clear Wink of Stella pen, and went over her eyes & wings with 3-D Galaxy Gloss.  Turned out pretty cute I think...Addison seemed to like it!  Thanks for stopping by!!


Monday, August 24, 2015

Sending Hugs

I don't scrapbook anymore & other than making greetings cards for my children, I've been trying to do some CAS cards that I can make several of, and send off to a charity.  I made this set of cards this weekend just past.  I saw a couple of examples of this layered style using the same stamp on Pinterest.  Most of the ones I saw were three layers, but I stuck to two to keep the bulk down for postage purposes.  The background stamp I used is the Flower Burst Pattern from Basic Grey.  I picked a bunch of pastel colored cardstock from my stash & matched up as best I could the Colorbox Chalk Inks that would complement them.  The Sending Hugs greeting is from the Avery Elle Sending You Set.  That bow is actually a three piece die cut.  It comes with several different shapes to be the knot, and I chose the heart.  For the life of me I can't remember who makes it although I can see the packaging in my head!!  Anyway...they're not too fancy, but thought they were cute enough for someone to send or receive with a personal note inside!  Thanks for stopping by!


Challenges Entered:


Monday, August 17, 2015

Happy Birthday Elaine!

So I tried to make a birthday card for my daughter Elaine by repeat stamping with ink on a white background & placing a sentiment as a focal point in the center.  The border stamp I used was from a Fiskar's set which I had right here by my side a day ago & have already misplaced...sorry..how many times has that happened to you..LOL!!!  The inks I used were Colorbox & the "smile" sentiment is from a Little Yellow Cycle die set I got from Hobby Lobby.  I die cut the smile sentiment from black card stock, adhered it on the front of the card, then went over it with some clear Wink of Stella.  I stamped the "It's Your Day" sentiment from Stampin Up below it.  Added some lavender sequins in both corners & called it a day!!  Although I thought of a few upgrades I should have done to the card, my daughter really liked it and that's all that matters!!  Thanks for stopping by!!


Challenges Entered:


Monday, August 3, 2015

Summertime Fun!!

I've had this adorable summertime "Quiet Inspiration" image from Sassy Cheryl's Stamps colored up for quite some time.  She's been hiding on my craft room table underneath many uncolored or uncarded images for quite some time.  I came across her recently again & she made me smile!!  I  just had to add her to a card that I will send to SendASmile4Kids organization.  I found some paper to match the Promarker's I used to color her, die cut her out & framed her with the MFT Stitched Ovals die & used the really cute sentiment from the Hero Arts CL351 Friends stamp set.  Who wouldn't want some pretty winged bluebirds to keep you company while you cooled your feet off on a hot summer day!!  Added some pretty blue ribbon & enamel dots from my stash to embellish & called it done!!!


Sunday, July 12, 2015

Congratulations!

Well...It's been quite a long time since I posted anything.  Between weddings & business trips I've been a little busy.  Anyway...things have calmed down some & I'm hoping to do more crafting now.  My sister & her husband just finished building a new house & I wanted to send them a little card congratulating them.  I haven't even seen it yet...hoping to today sometime!!  So I made the card below using a cute Hero Art stamp set called "Right at Home".  The house & sentiment are from the set and I colored with promarkers, the fence was cut on my Cricut.  It's a very simple card, but I think it's cute and I know she'll like it!!


Challenges Entered:


Wednesday, April 8, 2015

Sending Love Your Way

About a month  ago I  bought some Unity Stamp sets that I thought were really cute & were on sale, and I subscribed to their newsletter/posts at the same time.  There is only one store locally that I've ever seen carry their stamps (Archiver's) and they closed about 8 months ago & are an on-line company only now.  Anyway...I received an email from Unity Stamp  today stating that today was the last day to enter their "Be Inspired" challenge using one of their stamp sets.  I haven't created much of anything in the last month and thought....Holy Cow...I  bought some stamps from them recently & should make myself whip up a card for their challenge!!  Probably won't win but at least it will make me feel good creating a card again!!  So here is my fastest ever created card...and I really like it!!  I decided to use their Inspiration Color Photo to create my card.  The stamp set is "Sending My Love", and I colored it with my Promarkers Pastel Pink, Salmon Pink, Apple, Meadow Green, Pine, and Cinnamon.  The papers are from my stash & closely resembled the Pastel Pink & Salmon Pink Promarker's colors.  The enamel dots in the upper left corner are Teresa Collins Signature Essentials.  Thanks for stopping by to take a peek!!


Challenges Entered:


Saturday, March 7, 2015

Happy Birthday Mary!

My sister Mary's birthday is not until the end of March, but I saw a couple of fun challenges going on currently & thought I might as well get an early start on her card!!  The white base of the card is 5 1/4 x 7 1/4.  The pink solid paper is from My Favorite Things and is 5 x 7, then the pink polka dot paper is 4 3/4 x 4 1/2, and the pink striped is 4 3/4 x 2 1/2. Both of those papers are from Doodlebug Design 6 x 6 paper pad called Sugar & Spice.  The sentiment is from an Avery Elle set "Sending You".  I heat embossed it using Recollections Embossing powder.  The pretty pink doily die behind it is Cheery Lynn's Chasing Rainbows. The crocheted white lace is from my stash & the pink satin ribbon is from Really Reasonable Ribbon.  I really like the way the card turned out, and I think my sister will also!!  Thanks for stopping by to take a look!


Challenges Entered:


Friday, February 27, 2015

Happy Birthday Emily!!

I have been wanting to make a shaker card ever since I watched someone post a blog video of their shaker card...probably AT LEAST a year ago!!  Now they've become popular again recently it seems & I decided I was going to finally make one "come hell or high water"!!  (Part of my New Year's Eve resolution to be more creative & try new techniques). Since my daughter Emily's birthday is coming up March 1st....she is the unknowingly recipient of my first ever shaker card experiment.  There are several ways to make shaker cards, but I decided to follow a tutorial posted by Jennifer McGuire that produced a "No Bulk" shaker card.  Jennifer posts excellent video tutorials on card making techniques.  Anyway...I followed her post for the most part.  I made the window cutout using Spellbinder's 5 x 7 Matting  Basics die. The sentiment "birthday wishes" stamp on the acetate front is from Avery Elle, and the "On your special day" stamp is from a totally different stamp set that I cannot remember/identify at this time!  I sprinkled some Martha Stewart hearts & star sequins inside,  along with some Walmart purchased silver octagon shaped sequins & some blue colored sequins from "I don't know where"!  A completely experimental card, but I think my daughter Emily will love & appreciate it just the same!!  Thanks for stopping by to take a look/see!!


Challenges Entered:


Monday, February 16, 2015

Happy Valentine's Day 2

Here is my second Valentine's Day card I created for my grandchildren!  This is a Sassy Cheryl image that I purchased quite a while ago...she's so cute...but I don't recall her name....I colored her with my Promarkers & die cut her out with My Favorite Thing's Dienamics stitched ovals.  Wasn't exactly sure what I was going to do with her, but decided to follow a Sketch Saturday challenge using papers from My Mind's Eye 6 x 6 pad called Cupid's Arrow.  I am definitely fearful of using patterned papers together, but with this designer pad it turned out to be fun and I really like the resulting card!! The sentiment is from a Close to My Heart set called "Whooo's Your Valentine".  Hope you like it...thanks for stopping by to take a look!!


Challenges Entered:


Happy Valentine's Day

For Valentine's Day I usually mailed each one of my grandchildren a Valentine Day card with a Frisch's (local burger joint) gift certificate for a free children's meal. Since I'm up to 8 grandchildren I decided to just make a card for each family!!  Here is the first one I made using a Pure Innocence stamp & papers from my stash, following one of the My Favorite Thing's sketch.  I decided not to go with the traditional red, pink & white, colored her with my Promarkers, cut her out, and popped her up with some dimensional foam.  I really like the sentiment...it's from a Hero Arts stamp set...CL582?
I think it turned out pretty cute!  Thanks for stopping by to take a peek!


Sunday, February 8, 2015

So Special To Me

This card was a lot of fun to make although it took me about 3 weeks to finally finish it!!  I wanted to try using textured paste with a stencil....another technique I have seen lately but never tried.  To start I  die cut my white card panel out using a stitched rectangle from the Simon Says Bundle of Stitched Shapes.   Then I used some Deco Art textured paste over a Heidi Swapp stencil to create the batch of hearts on the panel, let it dry, then colored them with a Hot Pink Promarker.  I went over each heart again with a clear Wink of Stella marker to add shimmer.  I loved the results, but then the card front stared at me for another couple of weeks until I finally decided how to finish it & who the recipient would be! (Another secret I cannot divulge until the rightful owner opens it).  I really love this sentiment from the Hero Arts set CL582.  I wanted this to be a CAS card, but besides the hearts & sentiment, I felt like I clearly needed to add SOMETHING ELSE!...I cannot deal with a lot of wide open white spaces!!  That's when I remembered the cute Mama Elephant "In My Heart" stamp set.  I stamped & colored the little girl on another piece of white card stock, cut her out, added Wink of Stella to the little heart on her dress, then added her to the card front with foam tape.  I also added foam tape to the back of the entire panel & adhered it to the matching pink card base. I think it turned out pretty cute!  Thanks for stopping by to take a look!!


Challenges Entered:

You Rock!!

One of the things I wanted to try this year is different techniques!! (I think that was my New Years Eve vow last year also!)  I'm just a freak about trying new things and worrying about doing them wrong and wasting some paper....like I didn't have an abundance of it!!  Anyway....sometime during the Christmas holidays (I think) I bought a new Simon Says Die called Mod Circle Frame.  It just looked like fun & something totally different than what I usually purchased.  I wanted to make an inset card, so I cut the entire die out three times with pink, red & white, then played with it until I decided what color to use as the frame & what colors to use for the insets.  I found a card on Pinterest using this die & followed the basic concept.  I also wanted to use the "You Rock" sentiment from the MFT Blueprints 11.  Sequins in varying sizes are also a big thing right now, although I only owned some red ones that were all the same size.  So this is the card I came up with...nothing earth-shattering, but something new for me, and I have the perfect recipient for it. Can't tell you who until after February 14th, because that would spoil their fun, but someone who has gone the extra mile lately under stressful circumstances.  Hope they like it!  Thanks for stopping by to take a peek!!


Challenges Entered:


Monday, February 2, 2015

Well it's been three months since I posted anything on my blog.  I made a vow sometime around early
November last year that I would not post another card ever until I cleaned up my scrap room!  Since then Christmas & New Years happened and January is already gone and I've made some progress but my scrap room is still a hot mess!!  It's now February and Love/Valentine cards need to be posted!!  So I'm thinking Easter is the next big holiday that I will be making cards & posting them! In addition,..,Last week we had to place my mother in a retirement home because she could not physically/mentally  take care of herself anymore and it's been a real roller coaster ride!